
Every couple of months Christopher RÆBURN opens up his studio on a Saturday for his customers to bring along their damaged RÆBURN items so his team can fix them. For free! It’s a fantastic commitment but it’s not what I want to write about, no sir, I want to write about the masking tape I noticed on the lamp in the image they used in their email invitation!!!

My eyes were drawn to this inconspicuous detail hiding in plain sight, a piece of masking tape casually draped over the lamp in all it’s louche glory. I couldn’t help but think this hasty little fix was probably quite temperamental causing irritation and frustration by falling down onto the items being sewn from time to time. The kind of problem that we just accept and learn live with. This was like a red rag to a bull for me, I needed to fix it! So… I replied to their email with a request to do just that and they were remarkably welcoming to my request.
When I met Zory, the head seamstress at RÆBURN, I proposed that I simply attach a magnet to her lampshade which would allow her to snap the light on and off the side of the machine as and when she needed to, a simple idea that should prove more reliable than the masking tape but also improve the functionality of the light for her. She loved the idea so I got straight to work. I stuck a magnet to the side of the lamp and a 1p coin to the side of the machine with Sugru. Finally, we had to wait 24 hours for the Sugru to set before we could try it out.

A few days later I popped back to the studio to test my fix and was delighted to find that it worked an absolute treat. More importantly, Zory was delighted and found that it worked much better than the tape and it was fun to use too. Yay. This was such a lovely simple shared pleasure. I love fixing stuff for strangers 🙂
But wait. There’s more.
This is where this little fixing story was supposed to end. When I got home I noticed something in my pictures that I had missed while at the studio; strewn across the top of Zory’ machine were a medley of magnets keeping her pins, needles, bobbins and other sewing gubbins organised. I had just stumbled onto another of Zory’ casual hacks and realised that I had an urge to fix this too! I wanted to bring order to this mess.

Keep it simple.
Rather than developing a new custom magnet for the machine, I thought that I could just re-purpose a magnetic knife rack instead. IKEA make a great one called FINTORP for just £7. This should make the project relatively quick and cheap for me to complete. As much as I can, I try to find solutions that anyone could easily copy themselves, and besides, sometimes there’s just no point reinventing the wheel.

It’s clever and hack friendly.
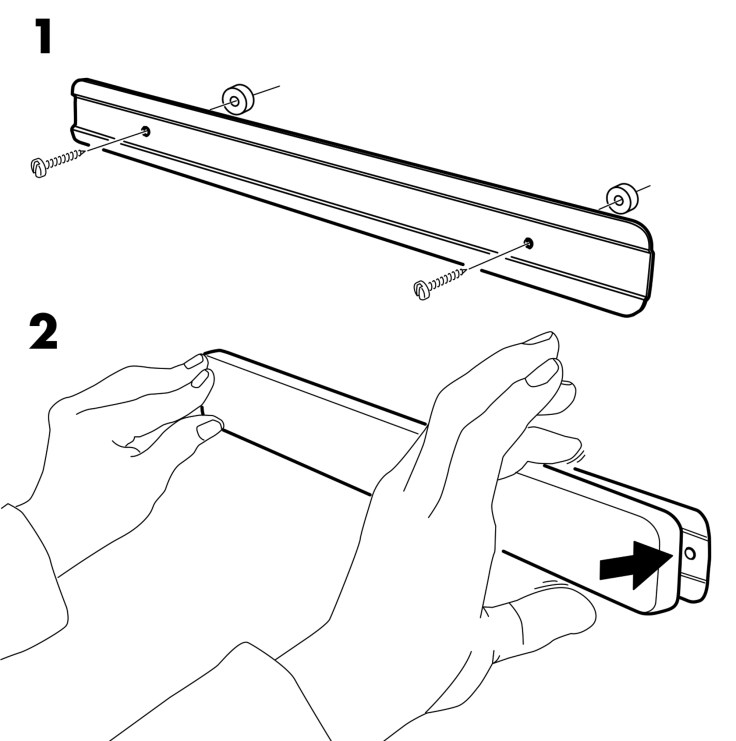
The design of this IKEA magnet knife rack is very clever, it comes in three main parts; two plastic spacers, a mounting plate and the magnet rack itself.

To install the rack, the spacers and mounting plate are screwed onto the wall, then the magnet rack is simply snapped onto it concealing the screws. Clever. However, the real genius here is how the magnets whose primarily function is to hold knives, are also deployed to hold the rack onto the mounting plate. Super clever.
Aside from this bit of design appreciation, I love how I can simply hack this rack by creating new spacers. It’s so versatile and open to interpretation.
I imagine mounting this lovely black knife rack upright on the top of the machine, kinda like a billboard. This way all her stuff would be presented nicely before her, all clear to see and easy to reach, or maybe I could mount it to the front of the machine? Hmmmm, Zory needs to tell me which location is right for her…
On sharing this new idea with Zory I was surprised to find her a little embarrassed that I had noticed the mess in the first place! I was too busy being excited by my observation that I was blind to how rude pointing it out might be. yikes! This was an important reminder that no matter how small or arbitrary an idea might seem or how much I might like to help that I should always remain mindful that I’m actually imposing myself in peoples lives and highlighting something that they may not be particularly proud of!
Moving on from this awkward little moment we discuss where she would like the magnet rack to be positioned and after exploring a few options she decides that she wants it installed on the top. We experiment with a few angles and I measure her preferred option so I can design and 3D print some custom spacers.
Design for maintenance.
As it turns out, the magnet rack would extend over the service hatch on the right side of the sewing machine so it was critical that the rack could be easily removed. Because of this detail I decided to use magnets again. Interestingly, the top of the machine was magnetic so I didn’t need to use 1p coins for this fix. I knew exactly how to design the custom spacers…

Once I printed the new spacers, I Sugru’d the magnets into the base of the spacers and then bonded the spacers to the mounting plate. Super simple. All I had to do now was wait for Sugru to set.

This is the mounting plate fully assembled showing off the new raised 20º angle. It’s all ready to simply snap onto Zory’ machine ready for the magnet rack. Exciting.

3D printing with recycled plastics!
Because of the RÆBURN commitment to using recycled materials in their work I wanted to find a recycled material to print the custom spacers from and was delighted to find several companies offering a wide variety of options. I chose rPLA from Filamentive. I also found an exciting UK company called re-filament that produce 100% recycled filaments from PET bottles, fridges and car dashboards!!!! Their film about recycling fridges at the bottom of their home page is fascinating and well worth watching.

I’ve uploaded the custom spacers onto Thingiverse and included a version that would allow you to Sugru the rack flat onto a wall if you would prefer to avoid drilling. As always, they are free to download and 3D print 🙂 If you don’t have a 3D printer, I would recommend 3D Hubs, the Airbnb for 3D printers which will find a local 3D printing service for you. The magnets I used are 20mm diameter by 3mm thick N42 Neodynium magnets which are available from the Sugru website as part of the magnet kit but of course you can buy them on their own from other suppliers too.
Make it beautiful.
I made my way back to see Zory with this new fix. Placing it on her machine it felt a little bland so we chatted about customising it with some recycled fabrics from the RÆBURN collection. Zory grabbed some scraps, first we loosely draped over some parachute silk but it looked awful! Then we tried some of the branded webbing and it instantly looked fantastic. Not only that, when we popped the metal bobbins and needles onto the rack, they made a satisfying muted sound rather than the harsh snap of metal on metal, a glorious little design accident.

I hadn’t even begun to think about how to attach the webbing to the rack when Zory instinctively reached for the double sided tape. I just love the no nonsense approach of makers; doing stuff is just second nature. Her intuitive behaviour is the product of years of making that builds confidence in doing and is beautiful to witness. The webbing was installed in two minutes flat and looked great.

The branded webbing transformed the fix making it look absolutely amazing!!! I just love how the fix is now imbued with the ethos of the studio “REMADE REDUCED RECYCLED RÆBURN” emblazoned on the machine and Zory immediately placed everything onto the rack in a clear logical order, from left to right; bobbins, pins, machine needles and finally safety pins. This fix totally rocks and I’m as proud as punch. I’m beaming and I notice that Zory is beaming too 🙂

Machine pride.
A few days later I popped back to the studio to see how everything was working out. Zory and I got chatting and I was delighted to hear about her newfound machine pride; bringing order and the RÆBURN ethos to her sewing machine has usurped her subconscious embarrassment with a real sense of pride. What a lovely outcome. She told me that the other seamstresses were a little jealous too. Perhaps I need to make a few more of these 😉
Workstations often become chaotic spaces that make us feel disorganised and guilty for not getting on top of things, but bringing order to the space has made Zory just that little bit happier. Yay for the little victories. These might seem small and irrelevant but I believe that they contribute to happiness in a meaningful way. I now like to think that each time Zory reaches for a bobbin or a needle that she experiences a small sense of the positivity and joy that this project was made with.
Am I mad? (Is that rhetorical?)
As I cycled home I laughed at myself and the absurdity of obsessing over a strangers sewing machine. What on earth was I thinking?! But the truth was that I loved it. It felt so so nice to indulge something as small and inconsequential as this. Instinctively I pursued the project even though I did fell like a bit of an odd ball at times but the thing is that connecting with Zory and making the effort to fix some teeny tiny problems of questionable consequence for her brought me loads of joy!!!
Fixing for strangers is full of some of the smallest and purest expressions of happiness I’ve experienced professionally in some time. I write this blog to share observations and process but what is also emerging is the simplicity of the pleasure derived from taking the time to think about the mundane, to indulge the things we tend to ignore. I’m a designer and I’m discovering a love, a deep love for the everyday, the inane, the banal and the inconsequential.
The world moves at an alarming pace, news reports the most dramatic events, the stories are tailored to attract attention, to peak peoples interest but these stories are weaning us of the ability to appreciate the small and simple things. Perhaps talking about the insignificant, marvelling the inconsequential, connecting with the minute of our lives is where we can all find a little joy. As I explore this thought, I’m reminded of how happy I felt when I finished each of these little projects. I was delighted that they worked, that Zory enjoyed the interaction and appreciated the effort and the result, each of them a tiny capsule of life affirming pleasure. Thanks guys.
Thank you for taking the time to read this post, I do hope you find these explorations interesting and they energise you in some way. While you’re here, why not sign up to follow this blog and of course, let me know your thoughts and share your suggestions, I’d love to hear from you.
Until next time, happy fixing.
James

Reading these makes me happy for you!
LikeLike