
I spotted this IKEA clothes rail dumped outside some flats near my home. The tape around the joints suggested that someone had tried to fix it already but had given up. Well now it’s my turn 🙂

As it’s illegal to just remove something from within the boundary walls of a property, I buzzed the three flats hoping to find the owner. There was no answer from the top two buttons but the third flat answered and fortunately it was theirs. Phew;)
Milly from flat A was pleasantly surprised by my request to fix her broken clothes rail, she thought it was really sweet of me but also wanted me to know that she had already replaced it. I still very much wanted to fix it though so bundled it up and took it home with me. Even if Milly no longer wanted it, I thought it would be an interesting exercise and I could always find a new owner for it.
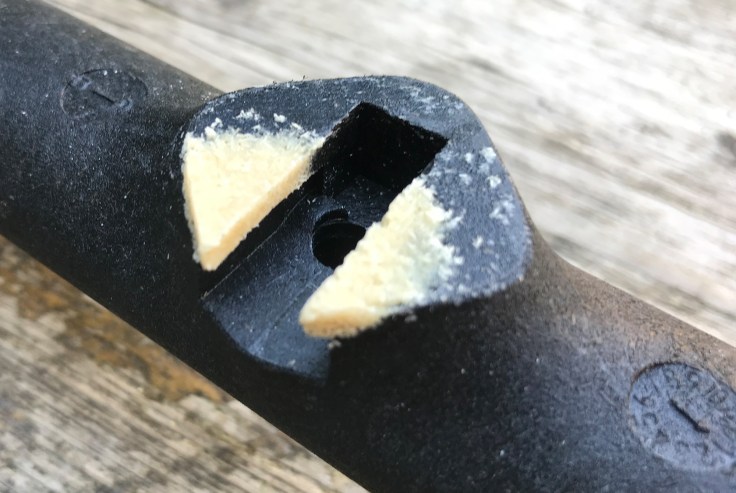
I think that the TURBO clothes rail is a great piece of design and deserves all it’s pinterest love. It’s a deceptively simple design made from just four pieces of injection moulded plastic that simply slot together and uses two screws to make it solid. I noticed that the screws were missing though. Something tells me that Milly never installed them and I suspected that this may have been a contributing factor to it breaking. The screws effectively clamp the parts together preventing lateral movement that would put a lot of strain on the plastic parts. I decide that if I manage to fix it, I’ll ask her.
OMG. IKEA dot com.
The first step for me was to get replacement screws which was pretty daunting. How do you get replacement parts for a product you found on the street and didn’t even buy?!!! The IKEA website was my first port of call and this was where I made two amazing discoveries.

Discovery #1
First of all, IKEA have an online fittings and spare parts service, you don’t even have to go to one of their stores. It’s very easy to find the parts you need. Just go to the product page and download the assembly PDF by clicking “view more product information” then “assembly instructions / documents” and you’ll find the parts are clearly numbered. Enter the part number into the spare parts field and that’s pretty much it. The big surprise for me was that they were free of charge! I didn’t need a proof of purchase. Let me say that again, the parts were free and I didn’t need a proof of purchase. Less than a week later, two new screws arrived in the post for me. I was so impressed. This service helps you keep your IKEA stuff going for longer but more importantly, it removes all the pain points in doing so. Usually, companies charge a lot for spare parts, (link to dishwasher blog post) so to have them delivered for free is just remarkable. I take my hat off to IKEA for this.
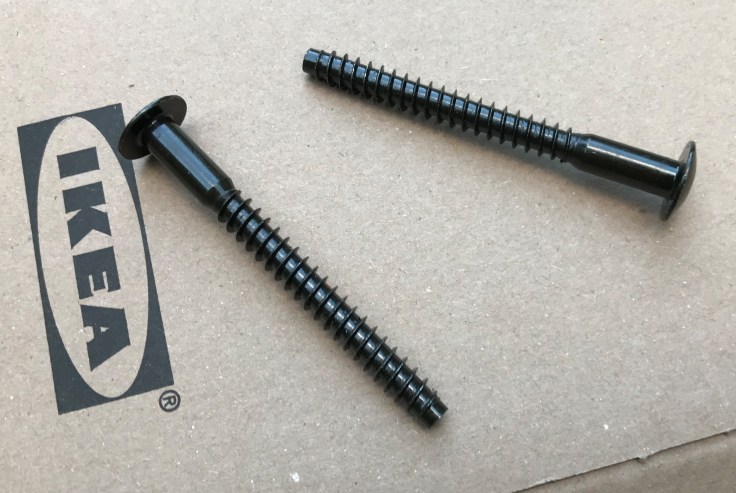
The screws are pretty interesting in themselves. The threads are much deeper than normal IKEA screws so I figure that they are self-tapping. This means that when you screw them in for the first time that they cut their corresponding thread into the part. The benefit here is that the plastic on the clothes rail is not threaded making the part cheaper to manufacture which is good for IKEA and their customers as it helps to keep costs down. When I looked into the hole I noticed that there was no thread visible, this supported my theory that Milly never installed the screws. I’m much more confident now that this was a significant contributing factor to the clothes rail breaking in the first place. I also find myself thinking about the design language of the product, did the slot together detail make Milly and possibly other people feel that once all the parts were slotted together that the rail was sufficiently assembled? Did the design language or the semiotics of the design make the screws feel unnecessary? It’s interesting to think about what the contributing factors are to something failing and in situations like this I like to adopt the mantra that the customer is always right, that if they feel it was fully assembled that perhaps there was something wrong with the design language of the product.
Discovery #2
The second thing I discovered was that the clothes rack is made from a plastic AND wood composite. I had assumed that it was made exclusively from plastic but discovering that there was wood in the mix gave me a super interesting idea, would it be possible to fix the broken part with PVA wood glue?
Bonding wood with PVA is fantastic. PVA is very easy to use and sets incredibly strong often creating a fix stronger than the wood itself. It’s kinda like welding but infinitely easier. If this worked it would be amazing. It would mean that I wouldn’t have to experiment with other glues. For example, my experience with super glue in the past made me confident that it wouldn’t work and I was skeptical about epoxy working too. If I did try these glues and they failed, I would then have the horrible challenge of removing the glue to try another method. I wanted to avoid these glues at all costs. I find that I really want PVA to work so I test it out straight away…
I used masking tape to hold the two parts together while the glue set. PVA likes 24 hours to fully set but for security I left this for two days and then peeled off the masking tape to test the bond. It had set firm. I was shaking my head. Incredible. I’ve just fixed plastic with wood glue! This is absolutely fantastic.

It works.
Not only did it work, it actually seems to work really well. WOW, IKEA make plastic furniture that can be repaired with PVA glue! I want to see more stuff made with this plastic. It’s amazing.
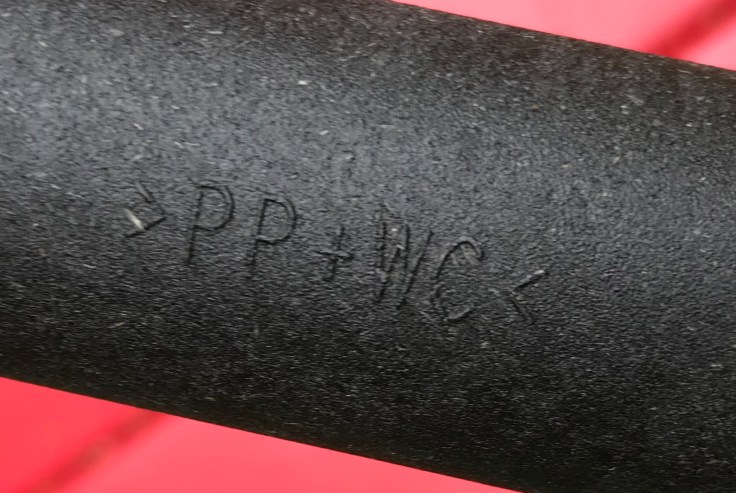
As I was examining the fix, I spot the following lettering in relief moulded into the plastic denoting the material it’s made from; “> PP + WC <“, on the IKEA website, the material is listed as a “plastic and wood composite”, now I know that the plastic is in fact PolyPropylene. Interestingly, Polypropylene is notoriously difficult to bond to, in fact, it is often listed on the back of glue products as a plastic the glue will not bond to. Remarkably, by adding a composite to PP, it transforms it into a material that can be glued and glued with a generic and super affordable water soluble glue that is very safe to use. Now that’s pretty magic. There is an awful lot I don’t know about this material but I did find this page on the IKEA website about their use of composites and this is what they have to say:
“A composite material consists of two or more materials – each with different characteristics. At IKEA, we use composite material because it’s strong, low maintenance, low price, and light. An example is wood-plastic composite. Using wood fiber waste makes plastic products stronger and less expensive – and it helps put waste to good use. That’s the beauty of composite: there’s less material usage and a great potential to utilize lower quality materials (otherwise classified as waste) and turn them into something new that is strong, compact, and light with a long life time. Find composites in everything from BILLY bookcases, ODGER chairs to RÖDTOPPA covers.”
Plastics and Sustainability.
This triggered a lot of exciting thoughts, particularly around fixing and sustainability. The big issue is that lots of products are made from plastics that require specialist adhesives to fix, but of course, most people aren’t specialists. What if it was possible to produce composite versions of these plastics that offer all the necessary material properties required but can also be easily fixed with standard glues? If this was the case, would more people fix broken stuff more often?
For example, PolyPropylene requires specialist adhesives and processes to bond, I found this interesting information from an adhesive manufacturer online. It describes how Polyolefins are difficult to bond due to their non-polar, non-porous and chemically inert surfaces and require surface pretreatments like chemical etching, flame treatments, corona discharge and gas plasma before using the correct epoxy, polyurethane, silicone or other adhesive system. Yikes, this is very complex stuff and a major deterrent to even considering fixing these plastics.
For a moment, imagine all the general use products in the world that are currently made from Polyloefins like Polypropylene and Polyethylene were made from composite materials like this that would allow for them to be fixed easily with traditional glues. I’m not an engineer and I have no idea how feasible using this material in these products is but it represents a possibility, a better future material than some of those currently used.
Plastics and responsibility.
Plastics are a wonderful material but their true cost is often not taken into consideration. Plastic bottles being the most widely discussed example in recent times with the provocative headline “A million bottles a minute” capturing the attention, imagination and action of people.
So who should the responsibility lie with? The manufacturer, the consumer, the government? It’s complicated. But I wonder if we could bake more responsibility into every stage of the life of plastic. This is a big big subject but in the instance of this particular project what if manufacturers were responsible for using plastics that can be fixed and supply information as to how they would recommend they be fixed, not just by a specialist but by the customer themselves, what kind of impact might that have on the material choices manufacturers make and to the fixing attitude it generates in customers?
Tell me which glue to use.
The next thought that occurs to me is whether manufacturers should be obliged to at least specify the correct type of glue to use to repair their products? There are innumerable versions of plastics used in the products we buy and they are almost impossible to identify. Knowing which glue to use would help people to fix their stuff in confidence. Right now, it’s a big risk putting glue on your stuff because you just don’t know if it’ll work. But making this information clearly visible to consumers could help nurture a positive and proactive attitude towards fixing. oooohhhh, this is an exciting thought.
Glue Mark. A new standard.
Now I’m thinking about what this might look like. What if a new international glue standard existed? A standard that was easy to implement and made choosing glue and fixing your stuff foolproof?
The thing is, in the real world, if a plastic product breaks or cracks, as a consumer you are left to your own devices to figure out what glue to use. There are innumerable plastics and innumerable glues on the market and it’s very difficult to know which glue to use for which plastic. What if there was a label to help you quickly and easily decipher what glue to use to fix it? Today, all plastic products must have a material code moulded in relief on them, much like IKEA’s >PC + WC< marking. Well, what if all plastics also had a Glue Mark coupled with the material code which would tell you what glue to use. This Glue Mark could then be printed on the packaging of glue products so that they are incredibly easy to pair.
For example, a plastic part with a >PP< label could become >PP – G3<. This immediately tells the user that the plastic is Polypropylene and has a Glue Mark of 3 which is a glue group identified by the manufacturer as the correct glue to use to fix this part. All glues labelled G3 can safely and confidently be used to glue this product. Would this be a useful way to help people understand how best fix their stuff and how to match it with the myriad of glues available at the DIY store?
This is just an idea, to fully resolve this would take a lot of work but the thinking is interesting. As a designer and avid fixer I’m excited by this idea but daunted too. It’s obviously a very very big idea, one that would take a very long time to implement and requires a lot of legislation and buy in on an international scale. It would be a massive undertaking to achieve but on the flip side, it could help everyone be more responsible and more sustainable, from manufactures to consumers. Something like this could go a long way to help normalise fixing again.
An IKEA case study.
I’m curious to expand on this idea, to play it out, at least in principle so decide to test it with the IKEA TURBO clothes rack I fixed. Looking at the product PDF for the TURBO it seems to me that there is opportunity to add information on what materials each of the product parts are made from and the proposed Glue Mark for fixing it. Ironically, IKEA are frequently celebrated for the simplicity of their instructions. They are almost entirely illustration based making them universally legible, an incredible achievement, so I appreciate that it’s a little problematic to suggest IKEA add information to these refined documents. The challenge for me is to represent this information with the same level of rigour they have.
I find myself admiring their design conventions. Their part numbers, written vertically beside the illustration for each part are very discreet. This information is not relevant at the time of assembly so it’s treated as secondary information, however, if you find a part missing (is that an oxymoron?), it’s very very easy to identify and get a replacement. I do notice however that they only list part numbers for the screws and the Allen Key. (I find myself wondering is the IKEA Allen Key the single most manufactured item in the history of the world!?) The main product parts do not have numbers. I suspect this is because IKEA don’t issue spare parts for this product. In order to introduce plastic and glue information to their standard PDF, I need to list all the parts so I borrow the illustrations from the assembly instructions and pop them in. It’s a bit of a squeeze but you get the idea.
Hahaaa, I find myself pronouncing IDEA in the same way you hear Swedish people pronounce IKEA 😉

My first attempt to incorporate this information works pretty well, my intention is not to produce the perfect incarnation of the idea but to capture the principle and I think I’ve achieved that. I’m excited by how simple the integration of this complex information could be, it’s discreet and unobtrusive yet easily visible when needed. Kudos to IKEA for their original design that I’ve clearly borrowed heavily from.

The convention I’ve developed is very simple and required zero rocket science. I’ve just presented the material code and the Glue Mark vertically next to IKEA’s six digit part number. With this convention, anyone using the IKEA assembly guides should easily be able to tell what glue to should use to fix each part. I think it’s simple but effective.
What about an IKEA Glue Isle?
The next logical thought that occurred to me is an IKEA Glue Isle. Imagine a world where IKEA incorporates the Glue Mark into their product PDF’s and to compliment it they have a corresponding Glue Isle in their stores. If any IKEA customer needed to fix one of their products, this is where they would go to get the correct solution. It would be the most cohesive and sustainable approach to fixing from a single brand that I’m aware of!
This is one heck of a BIG IDEA. For fun, I thought I’d explore a hypothetical Stage Gate to making it happen. This is standard practice where a large project is broken in manageable stages so that over time, the full breadth of the project is realised as opposed to the altogether foolhardy approach of trying to do everything at once.
What might a stage gate look like?
Stage 1: Develop the Glue Mark convention.
To get this off the ground, the logical starting point could be to work with a glue company or indeed a university to develop the Glue Mark. This is a meaty project and requires a lot of technical knowledge. I image it would start by defining a comprehensive list of material groups and plastic part types and then develop a convention to match them to corresponding glues. This might need to include Food Safe, Medical Grade etc. options and possibly a strength grade. As I said it’s a meaty project. From this list the Glue Mark convention could be extrapolated. It needs to be pretty thorough from the get go as fixing it once released would be a nightmare.
Stage 2: Apply the Glue Mark to specific products, for the purpose of this blog post, I’m imagining a preliminary launch with IKEA.
It would be wise to start with a small collection of IKEA products, develop how it could be integrated and grow the implementation from there. Stage 2 would simply incorporate the information into their PDF’s and not yet incorporate the information directly onto the physical product parts. This might start with digital PDF’s only and not the printed documentation supplied with the product so Stage 2 could have a few stages of it’s own.
Identify what glue products would be used to fix the initial collection of products and source the relevant glue products. This would not be a comprehensive collection of glues, just enough to support the products supported. I imagine all the glues would be supplied to IKEA as white label and branded IKEA, something a brand of this size could achieve.
Stage 3: Incorporate the Glue Mark convention directly onto manufactured product parts.
All product parts printed, embossed or moulded with this convention can be very easily identified. Of course, there are many other stages to the successful implementation of this convention, education and awareness among consumers is critical for it’s use, this is really where progressive brands like IKEA can be thought leaders by being the first to herald new conventions. IKEA could make a significant impact on fixing culture and help grow the expectation for fixing as an option when people buy products in future.
I’ve focussed on IKEA in this so far as the idea started with their TURBO clothes rail, but of course companies with the right ethos could also be pioneers in the early stages of getting an idea like this off the ground. Dyson, Patagonia, LEGO, Philips, Apple, Samsung, the list is long and all of these companies could proactively get involved in the development and implementation of this.
Stage 4: Legislation / regulation.
The final stage is to build Glue Mark into product legislation or regulation. The work with IKEA could be seen as a trial phase where it is developed and tested and could form the foundation for baking the Glue Mark into product regulation where every company must supply fixing information with their products. Holy crap, wouldn’t that be incredible? Imagine a future where fixing products is actively considered and supported by the manufacturer?
So you thought the concept of working with IKEA to run a trial sounded big, well this would be an epic undertaking, one that would take several years to realise. But as regulation and business get behind phasing out single use plastics, the trend for thinking about plastics in a responsible and sustainable way is happening and perhaps it’s just a matter of time before we focus some attention on plastics in the longer lasting products we live with too.
Back to fixing my street find.
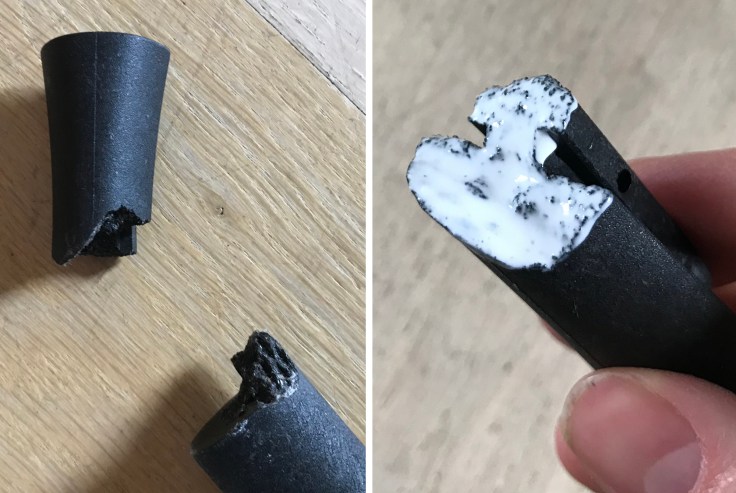
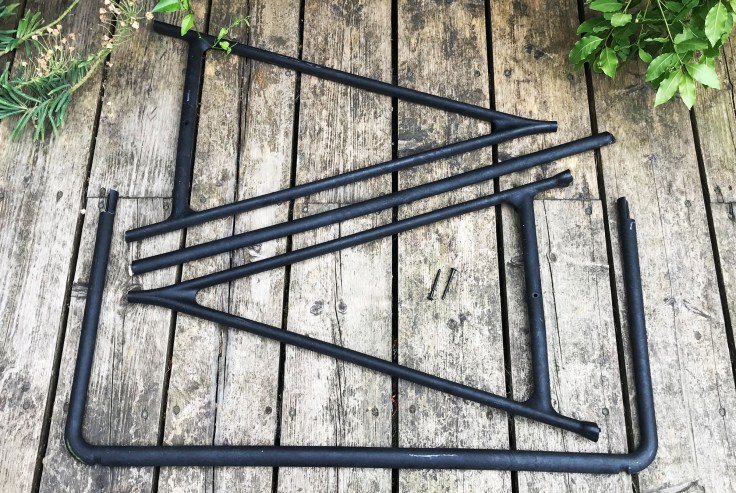
The first fix was a success, however, there was another part of the clothes rail broken too and this break was much more complicated. Small parts had broken off and were completely missing. Somehow I was going to have to rebuild the missing parts.

Now that I’ve discovered PVA glue bonds to this material a super interesting idea inspired by some experimental work my wife Jane had done years ago at the RCA came to mind. This work was the foundation that led her to invent Sugru! She had made all kinds of crazy objects in the workshop with PVA wood glue and sawdust that were so beautiful and spirited they blew my mind. They were also weird as hell and I loved them.

Prior to seeing these experiments, I had only thought of PVA as a practical glue to bond two pieces of wood together and had never considered it as a way to mould wood!!! By mixing PVA and wood dust or wood chips it’s possible to sculpt and mould wood objects by hand and without using tools. It was super cool and set incredibly strong. I was pretty confident that I could use this method to mould the missing parts, I just needed two things, sawdust which I got for free from a local wood workshop, and a mould.
The mould.
The easiest way to make an accurate mould of the missing part was to cast the other side with a mould making material, I used Siligum by Pébéo. It’s a two-part silicone moulding putty that mixes easily and sets quickly, it’s also non-adhesive so won’t stick to the part and is easy to remove. I could have used Sugru here as I have it handy but I thought I should use a product designed for this particular task.

Making the mould was very very easy. I mixed the two parts of Siligum together and pressed it over and around the part that was still intact and waited for it to set which took less than 10 minutes, man I love fast working times:) I peeled it off and then popped it onto the broken end, taped it in place with masking tape to make sure it stayed put during the moulding process.
Mouldable wood.
Hahaaa, I’ll call it mouldable wood, in reverence for Sugru Mouldable Glue. To make my mouldable wood, I figured that I would start with a small pile of sawdust and just mix in PVA until the consistency felt right.
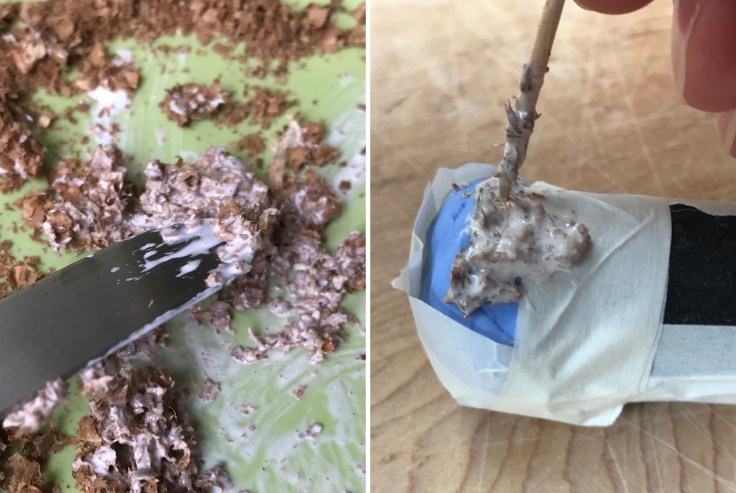
Using a toothpick I load the mouldable wood into the mould and prod it repeatedly to fill the mould as much as possible then leave it to set. PVA wood glue usually requires about 24 hours to set when bonding two pieces of wood together, I figured that this would need several days. Waiting is always the hardest part of a project but it was important as interfering with the part too soon would damage it.
Mould off.
Just to be sure, I left the part to set for 4 days then carefully removed the masking tape and gently peeled the mould away. It was nerve wrecking as I really wanted it to work and hoped my mouldable wood had set fully. It hadn’t! Not only that, the wood chips were clearly too big, way too big!

In spite of the failure, the experiment showed a lot of promise which gave me the confidence to plan the next iteration where I needed to make two changes; use finer saw dust and allow for a longer setting time.
I’m excited about mouldable wood, sure it’s a messy DIY material that requires patience but the thing is it works, is easy to use and incredibly cheap to make. I can’t imagine a more democratic glue. I wonder if there are loads of applications out there that this would be perfect for?
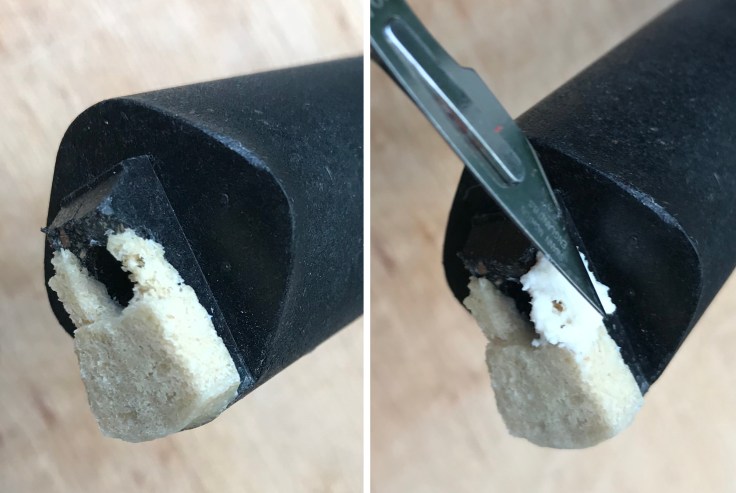
Back to the task at hand. I removed all the set mouldable wood from the part, it was encouraging how difficult it was to cut it off. I prepare a new batch of mouldable wood, this time made with much finer saw dust. This version was clearly easier to use as I worked it as deep into the mould as I could then left it to set. Waiting is always the hardest part of a project.

A week later I return to find out whether it worked or not. I nervously remove the mould and find that it was not fully set but that it was set sufficiently to hold it’s form. Now that the silicone mould is removed and the mouldable wood is exposed to the air it can set much faster. Ha. Fantastic. I punch the air delighted.
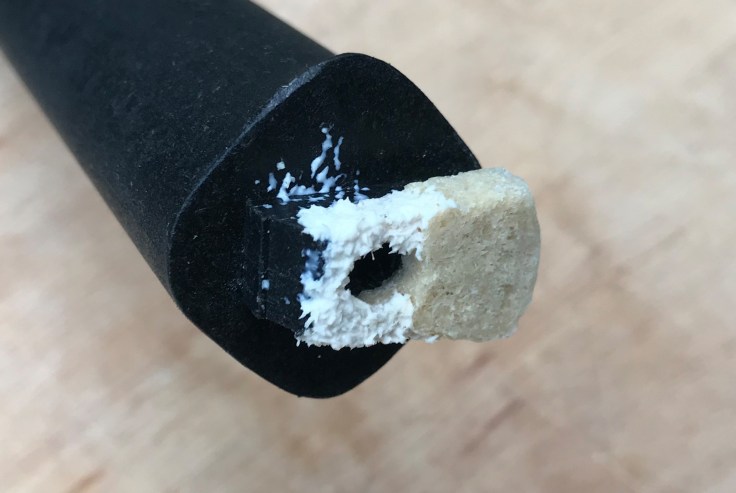
On closer inspection the bottom of the mould didn’t fill properly so I decide to fill this by hand to make it as strong as possible, I sculpt fresh mouldable wood onto the part and smooth it in with a scalpel blade. Again, I leave it to set, this time only for a few days. Finally, the clothes stand is ready for assembly and this makes me nervous again. I’m surprised with how invested I am in this actually working!
Assembly time.
I get all the parts together for the first time, at this point I realise that I’m an idiot! The “missing part” I’ve just rebuilt is not missing after all, it’s sitting pretty exactly where it had broken off. Hahaaa, I didn’t need to invent mouldable wood after all, I could have just glued it back on with PVA! But it’s OK, I learned a an awful lot from moulding it.

But then I discover that more parts are missing and I’m chuffed to have the mouldable glue process all figured out and ready to employ fixing that. Man oh man, I really should have examined this much more closely at the start.

A new mould.
My new mould turns out to be pretty interesting, as I need to top load the mouldable wood onto the part it needs to be completely open ended so I end up making what could be best described as a frame mould. The luxury of a product made in two halves like this is that there is a perfectly intact copy of the part I need to mould from. Phew;) otherwise I’d probably be in IKEA taking moulds from the products in their showroom. Hahaaa, I’m glad it didn’t come to that. For this mould, I use Sugru as I don’t have any more Siligum. I press Sugru onto the intact part, rub it smooth and leave it to set.


Two days later, I gently prise and wigggle the Sugru mould off the plastic part, it doesn’t adhere to it as it’s made from PolyPropylene, a plastic Sugru does not bond to. I then slide it onto the broken part ready to mould.
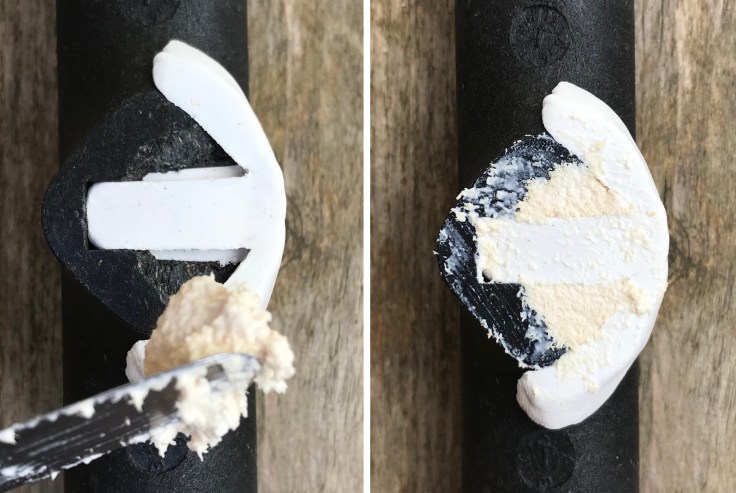
I use a kitchen knife to paste the Sugru onto the part and then use a toothpick to press it down into the mould to make sure that it’s well filled. The final stage is to level the surface with the knife and then leave it to set. I think this will set quicker as it’s a shallower part and is also a lot more exposed to air than the other moulds.
There is noting quite like fixing something complex like this knowing that it’s going to work, thanks of course to the first version I made, this is why I’m sharing so much of the process, now anyone can copy this with confidence.
I left the part to set for about a week before de-moulding and trimming it down, it looks pretty good. I notice that mouldable wood suffers from shrinkage when it sets but that shouldn’t affect these parts as I don’t think the tolerance is that critical.
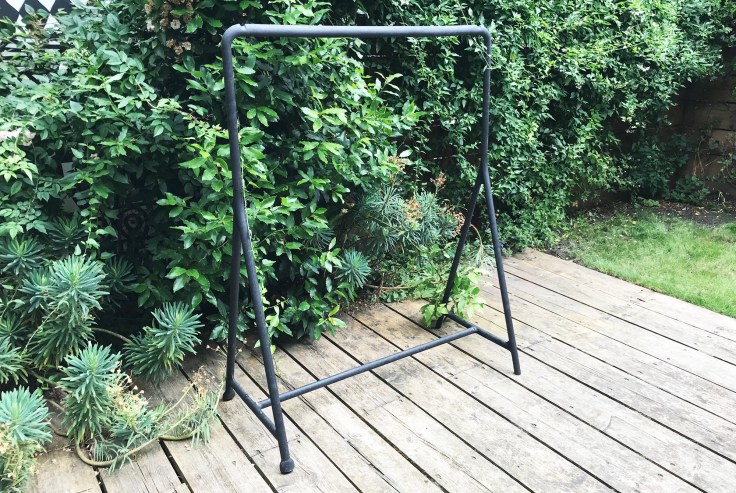
Assembly time. Again.
All the parts are finally fixed and I’m ready to assemble the TURBO and to test it all out. I’m a little nervous and emotional! Remember, these parts were all dumped and heading for landfill but now this clothes rail can go back into useful service again and that feels good. I want the ideas I’ve worked on to fix this product to work.
I slot the parts together and they fit nicely, there is clearly some movement between the parts though making it obvious to me now that the screws are critical in the assembly and stability of this piece of furniture. Once I’ve inserted the screws and tightened them I see how firm the design really is. I deduce that the slotting plastic design is primarily a mechanism for assembly, to help the user put everything together easily so that they can then be screwed tight. If Milly didn’t use the screws, the strain on the plastic slotting details would have been too much and would break relatively easily. These details were clearly not designed for that level of stress.

That reminds me, I wonder if the screws are self-tapping? I take it apart again to examine my self-tapping screw theory. Sure enough, there is a fresh thread cut into the hole on the part. Man, what a clever design this is. I wonder if the wood composite was a factor in what made this possible?

Right, it’s all fixed and fully assembled now. Doesn’t it look fantastic? After all my trouble with finding the Brababtia bins I fixed a new home I’m uncertain about going back to Milly with this but I’ll at least give her first refusal. If she doesn’t want it, I’ll find someone else. This was an absolute pleasure to fix though. I learned a lot of interesting stuff and had some great ideas along the way too. Fixing for strangers is a wonderful fixing adventure and I’m loving it.
If you own IKEA, do get in touch 😉
Fixing this TURBO clothes rack took me on a surprising and fascinating journey, I enjoyed figuring out how to fix it but was much more excited thinking about the bigger picture; how can companies proactively support people to prolong the life of their products?
Now that I’ve reached the end of this project I find myself thinking that it would be fantastic to work with IKEA on these ideas, to bring these concepts to an international brand with incredible influence and to see how we can make subtle but significant change in consumer behaviours, to normalise fixing and have a positive environmental impact.
If you own IKEA, do get in touch 😉
Thank you for reading, please share this post and sign up to hear about future posts.
Happy fixing.
James

Leave a comment